
I was a little worried when I was first doing this that I was just painting a blob and adding some lines that I was just going to make a mess - I am really happy with how these roses turned out!
Here is a look at the products I used for this week's Mani:

-Formula X nail cleanser, base coat, and top coat
-Morgan Taylor polish "Later Alligator" (green for leaves)
-Trust Fund Beauty nail polish "Elegantly Wasted" (purple for base coat)
-Trust Fund Beauty nail polish "I'm Kind Of A Big Deal" (medium pink)
-ORLY polish "Cake Pop" (light pink)
-Julep polish "Nellie" (dark pink)
-tools - nail art brushes and nail dotting tool
To start this Manicure, I used the nail cleanser and base coat with 2 coats of base polish - I used a medium purple polish but you can use any base color you like!

Let the base polish done well and here is how to do the roses:
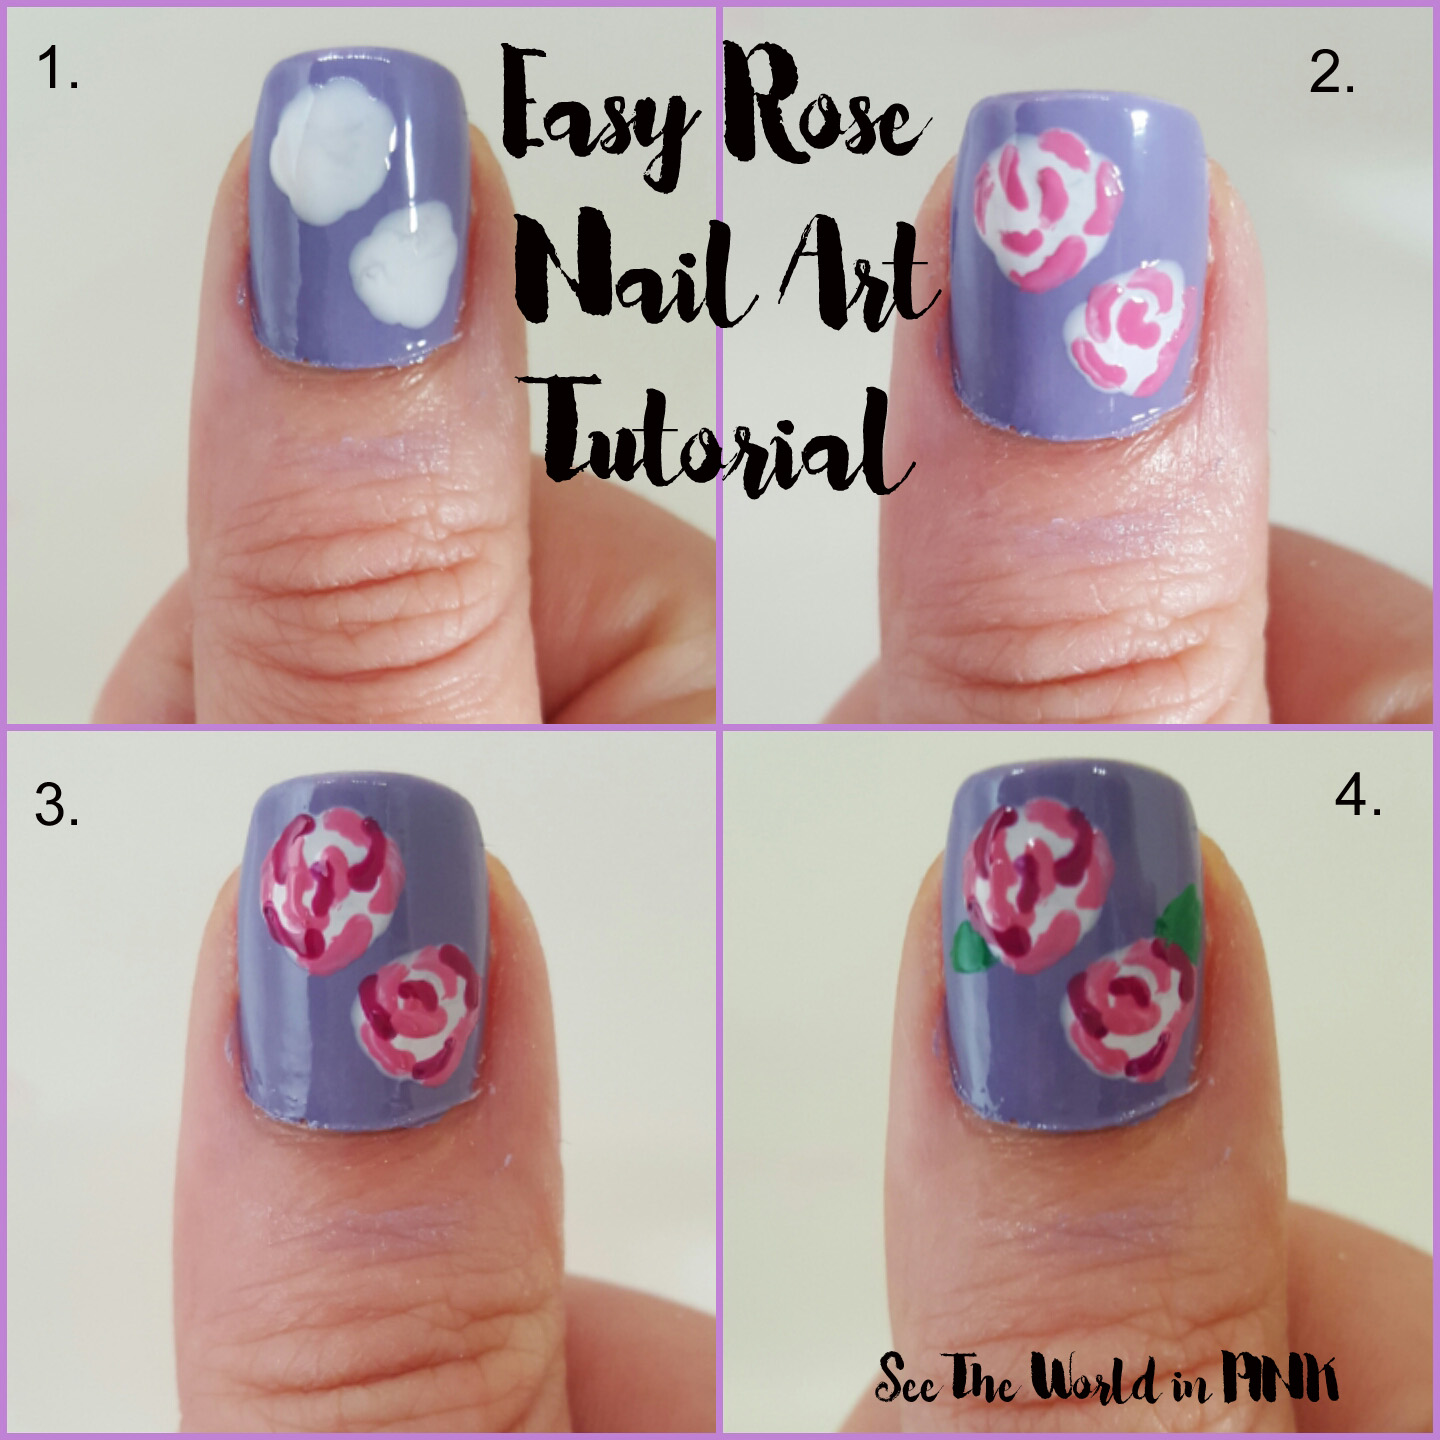
1. Using the light pink polish, take a nail dotting tool and create circles on the nails - they do not need to be perfect circles at all! Mine are nice misshaped blobs and work just fine!
2. Using the medium pink polish and a nail art polish, create little half circle brush strokes around the rose - there is no rhyme or reason, just think of rose petals or shading on roses. Make sure to leave enough light pink showing.
3. Using the dark pink polish, and a nail art brush, create a couple of dark brush strokes - I would suggest just doing a few dark strokes. Make sure there is still lots of light pink showing through to create a whole rose look!
4. Using a nail art brush and green polish, create a little leaf off of the side of the roses.
Add top coat once the polish had dried well!

Again, I love how the roses turned out! What do you guys think?
These pastel colors are gorgeous! You have talent, I can never paint in the lines prooperly haha
ReplyDelete(Also, on the rafflecopter entry, I wrote by accident that I commented on the blogiversary post when I meant to write that I commented here, so sorry about that! Hope that doesn't cause any problems)
won't cause any problems at all - thanks for letting me know!
DeleteAnd thank you - I love how these roses turned out!
This is so pretty! Thanks for the tutorial, I'm going to have to give it a try!
ReplyDeletethank you!! And, I hope the tutorial is helpful when you try it!
DeleteOhhh pretty! I love the colours you chose.
ReplyDeletethanks - I thought they would be great for Spring!
DeleteI can barely get an even coat of polish on my nails, and then there are people like you who can create these gorgeous masterpieces on your nails. They look gorgeous!
ReplyDeleteKatherine || The Green Bows
haha - thank you! Personally, I thought as I was doing it that it was going to turn in to a big blob so I'm happy it didn't do that!
DeleteThis definitely looks like nail art I can accomplish! lol I'm not good at art whatsoever, especially tiny art but this looks pretty doable ;)
ReplyDeleteI certainly always try for nail art that looks hard, but everyone can do it! The best part is they can all be a little different and it adds to the look!
Deleteadorable! perfect for Spring too!
ReplyDeletethanks!!!
DeleteVery pretty. I've never tried flower nail art like this before, like you I'm worried they won't be recognizable at the end.
ReplyDeleteIt's worth a shot - they turned out way better than I expected!
DeleteLooks super cute. I am loving that Trust Fund colour you used as your base.
ReplyDeleteThank you! I have been loving Trust Fund Beauty right now - their shades are great!
DeleteSuper pretty! I've tried it once before and it was a hot mess - I called it abstract nail art :P Definitely taking in your instructions and trying again :)
ReplyDeleteHope it helps! Going in to it, I thought I would end up with abstract nails too!!!
DeleteThis looks easy enough maybe even I could do it! I love that Trust Fund purple too.
ReplyDeleteThanks! I always go for looks that look harder than they are (who am I kidding - I'm not the best at nail art, but it's fun to try!) Hope the tutorial is helpful if you do try!
DeleteI really like the pastel colours you chose, and the flower design!
ReplyDeleteThank you!!
DeleteThose roses are pretty!!
ReplyDeleteThis turned out so nicely! I love doing roses, but when its time to do steps 2 and 3 I always mess it up. I think I'm using the wrong type of nail art brush.
ReplyDeleteThank you! Personally, I think this look would be harder with the long skinny brushes that are popular - I found the best brush was a short thin tipped brush (mush easier to control)
Delete